客户端码农学习ML —— 工具框架Tensorflow及Android、iOS上初步实验
与其上来就学习相对枯燥易让人放弃的数学,不如先做几个例子并在Android、iOS上初步实验熟悉下整个操作流程,通过实战激发下兴趣。
开发环境准备
首先安装Python,推荐Python3,装好后别忘了设置下载源镜像,不然安装各种包的时候下载速度很感人。
新建文件:~/.pip/pip.conf
1 | [global] |
再安装Numpy、SciPy、Pandas、Matplotlib、Pil、TensorFlow 、scikit-learn等库,都是深度学习不可缺少的。
pip3 install –user numpy scipy matplotlib ipython jupyter pandas sympy nose
更多安装介绍可参考底部参考链接。
TensorFlow的安装,官方推荐在Linux系统里安装gpu版,但我们学习阶段在mac上安装cpu版即可,官方从1.2版本后就不再编译gpu版的mac安装包,需要自己从源码编译,由于深知cpu版训练很慢,我自己尝试编译了gpu版,在10.13系统上遇到不少坑,各种修改耗费大半天后终于编译成功,完整一次性编译成功在2014款15寸mbp高配上大约需要近1个小时,具体可参考底部参考资料。
但由于不明原因,在使用gpu训练时系统会卡住,甚至花屏,直到训练完成才能陆续恢复,因此在mac上学习推荐直接用官方编译的cpu版即可。
pip3 install tensorflow
Python IDE个人看习惯随意选择,TensorFlow安装后先来个Hello world脚本试试各组件是否完备:
1 | import tensorflow as tf |
对于客户端程序员来说,Android、iOS的环境现成的。
AI在iOS上的应用:
在CoreML的帮助下,使用.mlmodel模型文件可以在XCode中自动生成调用模型的代码文件。
https://developer.apple.com/machine-learning/
https://github.com/apple/coremltools
.mlmodel文件可从上面Apple官方网页资料里下载回来,也可以用Python库coremltools将各种学习框架生成的文件转成.mlmodel,目前支持对Keras、Caffe、scikit-learn、libsvm、XGBoost生成的模型文件转换。
Coremltools当前还只支持python2,执行pip install -U coremltools,通用会有依赖库的冲突,可选择pipenv等python上的虚拟环境进行安装。
自己训练模型并将.pkl转成.mlmodel可参考:https://antscript.com/post/2017-12-28-step-by-step-machine-learning/
后续使用线性回归算法训练模型自己转一转,这里先下载苹果官方模型MobileNet回来试试效果:
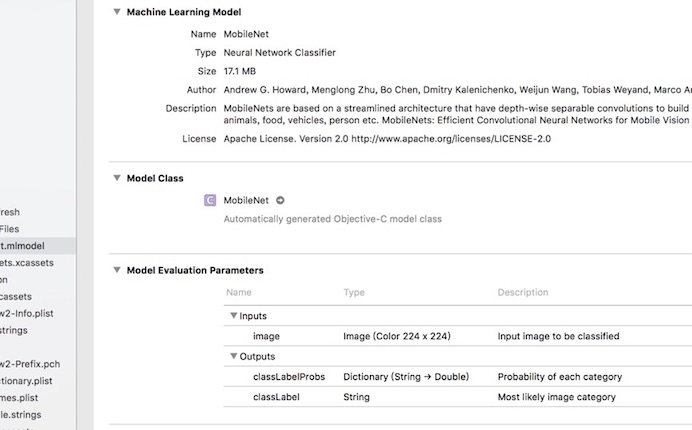
从中可以看出,输入是一个224*224的图片像素二维数组,输出有两个,classLabel表示最可能的结果文本,还有一个dictionary表示所有的识别结果及概率。
下面写个从摄像头捕获图片进行识别的app,也可以从相册里选择一张图,核心代码如下:
1 | CVPixelBufferRef buffer = [UIImage pixelBufferFromCGImage:scaledImage.CGImage]; |
其中有三个方法比较耗时,在iPhone7上大概如下:
- 将摄像头拍摄的图片裁剪成224*224大小,约75ms
- [[MobileNet alloc] init] 约90ms,但是它可以只初始化一次
- predictionFromFeatures 识别图像内容 35ms
App实际效果:
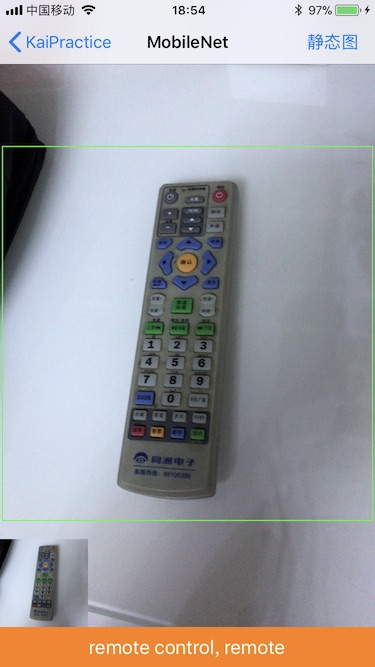
背景大图是摄像头捕获的完整画面,将中间一块方形缩小到224*224,左下角即模型接受的实际图片,底部橙色背景白色文字的的即结果,对于训练到的图片还是识别准确的。
AI在Android上的应用
Android上使用训练好的模型需要依赖TensorFlow的jar和so库,可通过配置gradle:compile ‘org.tensorflow:tensorflow-android:1.2.0’,也可以从https://github.com/tensorflow/tensorflow下载源码自己根据资料编译,可参考https://www.jianshu.com/p/6a2a98ad5c5b
方便之处在于都是google的产品,TensorFlow训练的模型可保存成.pb文件直接供TensorFlowInferenceInterface使用, 使用起来基本3个方法就可以了: feed、,run、fetch,分别是提供输入、执行、获取结果。
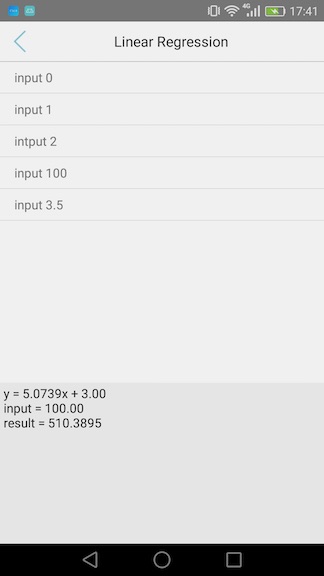
以下是一个简单的线性回归算法生成的kai_linear_only_mul.pb模型文件, 核心试验代码如下:
1 | mTensorFlowInterface = new TensorFlowInferenceInterface(getActivity().getAssets() |
试验效果如下图:
参考:
https://www.scipy.org/install.html
https://www.tensorflow.org/install/install_mac
https://github.com/fendouai/Awesome-TensorFlow-Chinese
gpu版TensorFlow需要的cuda资料:
cuda: https://developer.nvidia.com/cuda-toolkit
cuDNN: https://developer.nvidia.com/developer-program
mac上源码编译常见问题及解决方案:
http://www.jianshu.com/p/5df0c2f48b21
https://github.com/JimmyKon/tensorflow_build_issue_fix/tree/master
https://stackoverflow.com/questions/43113508/math-functions-hpp-not-found-when-using-cuda-with-eigen
https://gist.github.com/smitshilu/53cf9ff0fd6cdb64cca69a7e2827ed0f
https://github.com/nteract/nteract/issues/1523
LD_LIBRARY_PATH and DYLD_LIBRARY_PATH not imported on OS X
rather than disable SIP, I’ve resorted to linking the .dylib objects into /usr/local/lib. E.g., ln -s $ORACLE_HOME/.dylib /usr/local/lib
本文首发于钱凯凯的博客 : http://qianhk.com/2018/02/客户端码农学习ML-工具框架Tensorflow/